Slab Beam Reinforcement Detailing Guide
A few months ago, a mid-rise building in Mumbai collapsed; the slab cracked under load and dropped suddenly, killing six people. It wasn’t an earthquake. It wasn’t a natural disaster. It was poor detailing.
If you’ve ever had to repair cracked slabs, explain unexpected deflection, or rebuild a beam, you know: slab-beam reinforcement isn’t paperwork. It’s what keeps the floors from collapsing on people’s heads.
This guide shows you exactly what goes into slab-beam reinforcement: bar sizes, stirrup patterns, lap lengths, anchorage zones, and more, so you don’t inherit someone else’s mistakes. Because when reinforcement fails, it’s not just steel that breaks. It’s trust, time, and safety.
Detaling Essentials at a Glance
-
Root Cause of Slab Issues: A large share of cracking and serviceability failures in RCC slabs is linked to poor detailing, not concrete grade, making reinforcement layout a major durability factor.
-
Junction Attention: Slab–beam junctions are where failures start, so correct negative steel, anchorage, and development length are non-negotiable for preventing separation and cracking at supports.
-
Spacing & Cover Control: Bar diameter, spacing, and congestion rules directly influence crack width, compaction quality, and corrosion rate; too little cover or tight clustering quickly accelerates damage.
-
BBS Importance: A Bar Bending Schedule turns drawings into exact bar shapes, bends, and quantities, preventing mis-cuts, wastage, zone mix-ups, and on-site interpretation errors.
-
Supply Integrity: Reliable detailing still fails with wrong-grade or delayed steel.
That’s why SteelonCall helps keep detailing decisions true from design to delivery.
Why Slab Beam Reinforcement Matters On Site
Most slab problems do not start with a “collapse.” They start with hairline cracks at beam faces, edges that keep dipping a little more each year, and damp patches that never really go away. Recent studies link a large share of cracking and serviceability issues in concrete to poor detailing and insufficient or badly spaced reinforcement, not to concrete grade alone.
Here’s what that really means on your site:
-
Crack control: Correct bar size and spacing to limit crack width so water and chlorides do not reach the steel and start corrosion early.
-
Beam–slab joint performance: Proper negative steel and anchorage at supports keep slab–beam junctions from opening up and leaking under repeated loading.
-
Deflection and levelness: Top and bottom bars detailed as per spans and loads reduce long-term sagging that shows up as uneven floors and jammed doors.
-
Durability under real use: Adequate cover and congestion-free detailing help concrete compact properly, which slows down cracking and extends service life.
-
Repair and retrofit effort: Good slab beam reinforcement means fewer structural cracks to inject, fewer members to strengthen, and less downtime for the client.
Also Read:What are the pros and cons of a steel beam?
So once you know what reinforcement is protecting you from, the next step is making sure the detailing starts on the right foundation, not on assumptions.
Basics You Must Align Before Detailing Starts
Most slab–beam detailing problems don’t begin at the site; they begin when loads, spans, cover, and bar limits are not fully frozen before anyone opens CAD. Codes like IS 456 and SP 34 are clear: deflection, cracking, and durability are controlled as much by detailing rules as by design forces.
Get these basics aligned first, and your reinforcement drawing stops being guesswork:
-
Design loads, spans and support layout: Confirm final architectural grid, beam sizes and slab spans so bar layouts don’t keep changing mid-detail.
-
Code and detailing references: Lock the governing code (IS 456) and detailing guide (SP 34) so cover, laps, anchorage and bar limits are consistent across all drawings.
-
Cover, bar diameter and spacing limits: Decide minimum cover for exposure, practical bar sizes, and maximum spacing for crack control before starting the layout.
-
Serviceability criteria (deflection and crack width): Agree on span-to-depth ratios and crack width limits so the detailing supports long-term performance, not just strength.
-
Coordination with openings and services: Freeze slab cut-outs, ducts and sleeves early so reinforcement is not compromised later to “make space” on site.
Once these fundamentals are locked in, the real detailing work begins, starting with the beams that carry most of the frame’s bending.
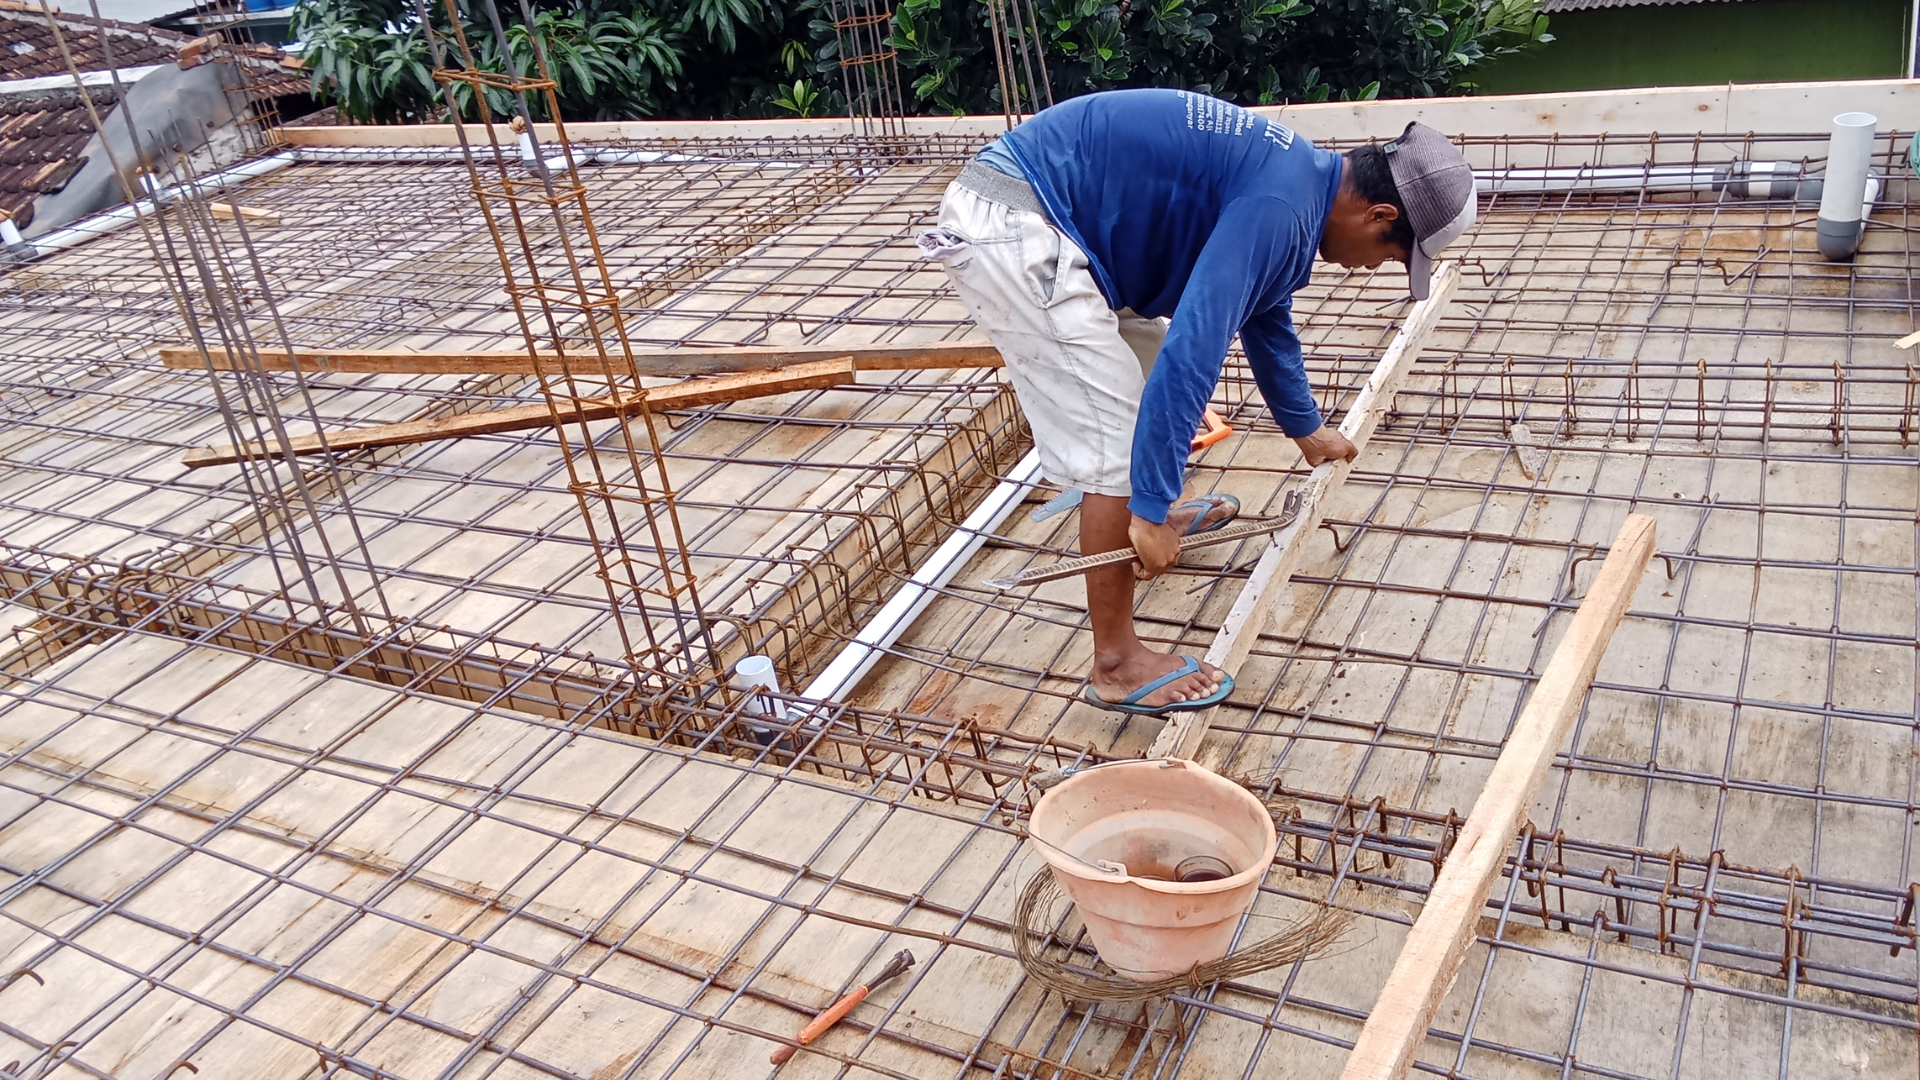
Reinforcement Detailing For Beams In Slab–Beam Systems
Beams are where the slab sends its bending forces to be handled and where detailing mistakes reveal themselves fastest.
The drawing may show simple lines, but the bars inside a beam have very specific jobs: some resist tension, some prevent the beam from splitting near supports, and some ensure the slab and beam behave like one member and not two loosely connected pieces.
Here’s what matters most when you’re detailing beams in a slab–beam system:
-
Main tension and compression bars
Bottom steel handles the highest tension at mid-span, while top steel near supports controls negative moments. Bar placement and layering must follow the actual bending pattern, not just the grid layout. -
Curtailment and crank bars
Bars need to extend until moments genuinely reduce. A proper crank lifts bars over supports to carry reversed tension, rather than stopping them abruptly where loads are still active. -
Stirrups for shear and torsion
Shear forces rise sharply near supports, so stirrup spacing must be tighter in those regions. Uniform spacing everywhere leads to diagonal cracks and weak zones. -
Anchorage into beam–column joints
Bars must be anchored with sufficient length inside the column so the connection remains stable. Poor anchorage often shows up later as joint cracking, rotation, or corrosion. -
Additional reinforcement around openings
Ducts, recesses, sleeves, and cut-outs change the load flow inside beams. Extra bent bars or closely spaced stirrups are needed to prevent local failures.
Even the best detailing only performs as intended when the right grade and size of steel reaches the site without mistakes or delays. SteelonCall ensures your beam reinforcement arrives exactly as drawn; verified quality, accurate specifications, and hassle-free supply across South India.
However, beams alone cannot protect the frame. The slabs above them must also be reinforced to support the same load path.
Reinforcement Detailing For Slabs Resting On Beams
Once beams are sorted, the slab steel decides how comfortably loads move into those beams and how your floor behaves over time. IS 456 and SP 34 are clear that crack width, deflection, and durability in slabs depend heavily on bar layout near supports, bar spacing, cover, and continuity across panels, not just on thickness or grade.
Here is what you need to get right in slab detailing over beams:
-
Main and distribution steel:
Main bars follow the span. Distribution bars control shrinkage and temperature cracks in the perpendicular direction, especially near edges and corners. -
Support and mid-span zones:
Extra top steel over beams and supports helps resist negative moments. Mid-span bars control sag and visible deflection between beams. -
Anchorage into beams:
Slab bars must extend sufficiently into the beam core so they actually transfer tension into the beam, instead of stopping at the face of the concrete. -
Bar diameter, spacing, and cover:
Limits on maximum bar size, minimum reinforcement percentage, and spacing help keep crack widths small and ensure proper compaction around bars. -
Detours around openings and services:
Wherever there are floor cut-outs or sleeves near beams, add trimming bars and local reinforcement so load paths remain continuous around the opening.
Where slabs and beams meet, stress spikes. That’s the next detail to get right.
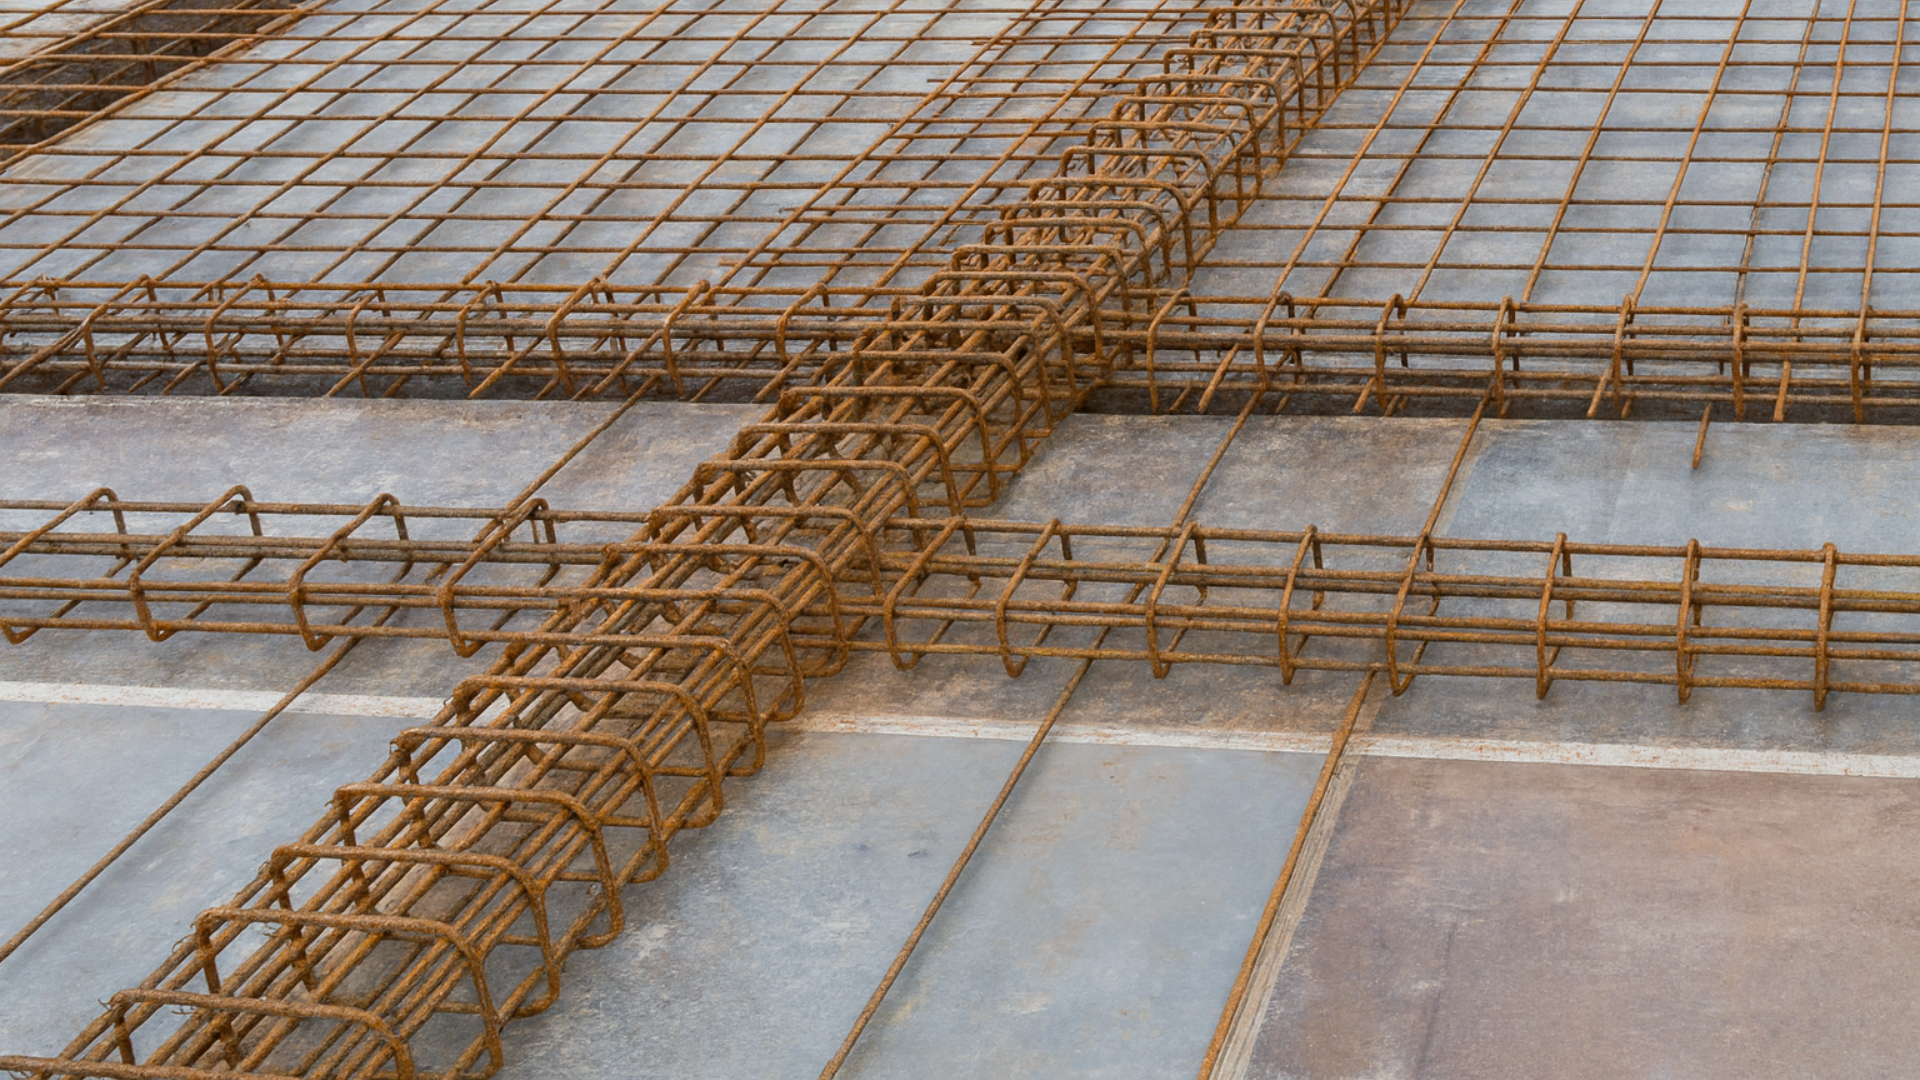
Slab Beam Reinforcement At Critical Junctions
Most slabs do not fail in the middle; they start misbehaving where elements meet. At slab–beam and beam–column junctions, moments reverse, shear spikes and bars compete for space. IS 456 and SP 34 both treat these regions as critical, with specific rules for negative steel, anchorage, and torsional reinforcement near supports and corners.
Here are the junction details that need extra attention:
-
Negative reinforcement over beams
At continuous supports, the top steel must resist hogging moments and extend into the span by prescribed lengths so cracks do not open at the beam face. -
Development length and anchorage into beams and columns
Bars from the slab should not stop at the beam edge. They need full development length inside the beam or column core so tension actually transfers into the frame. -
Torsional and edge reinforcement at corners
In two-way slabs supported on beams, torsional steel at corners and along discontinuous edges keeps corners from lifting and corners from cracking under twisting action. -
Bar layering and congestion control at joints
At slab–beam–column intersections, too many bars in one zone reduce cover and compaction. SP 34 recommends staggered laps, proper layering, and clear bar spacing to avoid honeycombing and weak concrete pockets. -
Extra detailing for seismic and high-demand regions
Around beam–column joints in seismic zones, closer stirrup spacing and proper confinement are essential so joint cracks remain controlled and the hierarchy of beam yielding before column failure is maintained.

When the details are locked, the next risk is confusion on-site. That’s where a clear bar-bending schedule turns your reinforcement plan into something installers cannot misread.
Bar Bending Schedules For Slab Beam Reinforcement
A well-prepared Bar Bending Schedule (BBS) is the link between design drawings and real steel on site; it turns structural drawings into exact rebar lengths, cuts, and bends you can order, cut, and place without guesswork. Using BBS reduces waste, prevents mis-cuts, and ensures that what goes into concrete matches what the design planned.
Below is a streamlined table that shows what a good BBS must specify, so slab and beam reinforcement get made, transported, and placed exactly as intended:
| BBS Field | What It Specifies / Why It Matters |
|---|---|
|
Member ID (Slab/Beam + Level) |
Shows exactly where each bar must be placed so different zones do not get mixed up |
|
Bar Mark & Diameter |
Confirms correct bar size and spacing so design strength and cover are maintained as per code |
|
Shape & Bend Details |
Records hooks, cranks and stirrup bends needed for anchorage, shear resistance, and support zones |
|
Cut / Bend Length |
Gives accurate lengths to reduce wastage and ensure bars fit correctly inside formwork |
|
Quantity (Number of Bars) |
Enables correct ordering and stock control to avoid shortages and excess usage |
|
Total Steel Weight |
Helps plan procurement, logistics, billing, and bundle handling at site |
Suggested Read: Thermo-Mechanically Treated Bars: A Complete Guide
Good detailing on paper still fails if the steel isn’t placed right on site. That’s where execution decides performance.
Site Practices That Make Or Break Slab Beam Reinforcement
Even when drawings and BBS are perfect, poor site habits can quietly undo the design. Indian guidance from IS 456, SP 34, and construction checklists repeatedly links early cracking, honeycombing, and corrosion to execution gaps like wrong cover, bad laps, and weak compaction around bars.
These are the practices that matter most on a live site:
-
Hold the correct cover:
Use proper cover blocks and chairs. Too little cover accelerates corrosion; too much cover reduces effective depth and strength. -
Fix bars firmly before concreting:
Tie intersections so the cage does not float or shift during pouring and vibration. Moving bars break the assumed load path -
Stagger laps and keep them out of high-stress zones:
Avoid putting all laps in one section or in peak tension zones, and follow IS 456 lap length rules. -
Clean steel and formwork contact areas:
Remove loose rust, oil, mud, and debris so the bond between concrete and steel is not compromised. -
Compact concrete properly around dense reinforcement:
Pay extra attention to beam–slab joints and congested zones so there are no voids or honeycombed patches around bars.
Also Read: Steel Test on Site: 10 Essential Tests for TMT Bar Quality Assurance
Even with good site discipline, some detailing choices still trigger trouble later. Those are the ones worth calling out next.
Common Mistakes In Slab Beam Reinforcement Detailing
Recent Indian studies on RCC detailing highlight three major culprits behind weak slab–beam performance: incorrect bar spacing, improper laps/anchorage, and congestion near joints.
With those risks in mind, here are the detailing errors you want to catch and eliminate early:
| Detailing Area | Mistake Seen Often | Impact On Structure |
|---|---|---|
|
Bar Spacing |
Crowded or inconsistent spacing, not checked with cover/aggregate limits |
Honeycombing, weak concrete around bars, lower durability |
|
Lap Length & Placement |
Short laps or laps stacked in the same section in high-stress zones |
Local weakness, wider cracks, risk of slip under load |
|
Development Length |
Bars cut short at faces or near joints |
Poor stress transfer, joint cracking, and reduced ductility |
|
Junction Congestion |
Too many bars/laps packed at slab–beam–column nodes |
Difficult compaction, low cover, faster corrosion |
|
Torsion & Edge Steel |
Missing corner/edge reinforcement in two-way slab systems |
Corner lifting, serviceability cracks along edges |
Those are the everyday mistakes. But some situations demand extra detailing muscle.
Slab Beam Reinforcement For Special Conditions
Concrete slabs resting on beams often face more than just vertical loads; factors like heavy live loads, seismic forces, cantilevers, or large openings change how reinforcement must behave. Indian standard IS 456:2000 (and detailing guide SP 34) account for these scenarios by prescribing stricter detailing wherever regular slabs may not suffice.
Below are the main special conditions you often see:
| Condition / Scenario | Key Reinforcement Adjustments |
|---|---|
|
Heavy or Concentrated Loads (machinery, racks) |
• Increase main bar area • Reduce spacing below loads • Add shear reinforcement where needed |
|
Cantilever Slabs / Extended Edges |
• Extra top steel over supports • Proper anchorage beyond the face • Strengthen corners against uplift |
|
Two-Way Slabs Near Beams |
• Stronger negative steel at supports • Adequate development into beams • Maintain continuity of bars |
|
Large Openings / Service Ducts |
• Extra bars around openings • Strengthen opening corners • Shift laps away from weak zones |
|
Seismic or Lateral-Load Zones |
• Closer stirrups near joints • Proper confinement for ductility • Ensure full anchorage of bars |
Must Read: 6 Types of Steel Beams Used In Construction
All of that depends on the steel you actually receive on site. That’s where sourcing matters.
SteelonCall For Accurate Reinforcement Supply
When reinforcement detailing is done carefully, the next risk isn’t design, it’s supply. Incorrect bars, wrong grades, or delivery delays can derail even the best drawings. That’s where SteelonCall becomes a practical choice.
Here’s how SteelonCall helps you control what reaches your site, so detailing isn’t wasted on wrong bars or late deliveries:
-
Wide catalogue with everything in one place:
With over 1,000 steel catalogues, you can source TMT bars, structural sections, MS rods, and special steel, all through a single platform. -
Strong regional network: SteelonCall supports fast delivery across Andhra Pradesh, Telangana, and Karnataka, backed by 250+ verified suppliers you can trust.
-
Instant, real steel pricing online: SteelonCall is the only digital steel marketplace that shows real steel prices online. Enter your requirement and get the price instantly
-
Bulk orders and flexible quantities are handled easily:
Whether you need a few bundles or a full-project supply, SteelonCall supports both — making it easier to match supply with your BBS. -
Support when you actually need it:
Got a query about grades, delivery timing, or documentation? The SteelonCall team stays reachable through WhatsApp, phone, and email, so you’re never stuck waiting for answers on site.
Using SteelonCall means your reinforcement arrives on time, with correct specs and traceable credentials, so what’s drawn on paper stands true on-site.
Conclusion
At the end of every pour, what remains hidden is what matters most. Slab–beam reinforcement is the only safety net your structure gets, and once the concrete sets, there are no second chances. Treat detailing as protection against tomorrow’s cracks, not just today’s checklist, because durability is built before the formwork comes down.
When you’re ready to translate your drawings into real steel, make sure the quality reaching your site matches the care in your detailing. That’s exactly why builders across South India rely on SteelonCall: the platform ensures what’s detailed on paper matches what goes into concrete. No grade swaps. No late deliveries. No compromises hidden inside the slab.
FAQs
1. What is the most critical detailing requirement in slab–beam reinforcement?
The most critical requirement is ensuring proper anchorage and development length at slab–beam junctions so that stresses are fully transferred into beams and the slab does not crack at supports.
2. How should bar spacing be decided for slabs and beams?
Bar spacing should be determined based on IS 456 limits for crack control, minimum cover requirements, and practical compaction around bars, after loads, spans, and serviceability criteria are finalised.
3. Why is additional top reinforcement needed at slab supports?
Additional top reinforcement is needed because negative moments occur over beams, and this steel helps control cracking, prevents separation at beam faces, and improves long-term durability.
4. What causes reinforcement congestion near joints, and how can it be avoided?
Congestion is typically caused by stacked laps, oversized bars, and multiple reinforcement layers meeting at beam–column nodes. It can be avoided through staggered laps, choosing appropriate bar diameters, and organising bars in proper layers.
5. Do slab openings require any changes to reinforcement detailing?
Yes, slab openings interrupt the load path, so trimming bars, strengthening corners, and relocating lap zones are required to ensure loads are safely distributed around the opening.
Steel on call
20 Dec, 2025